Aligning the detectors
Once we have corrected the Ronchigram and the pivots, then
all we have to do is get the detectors lined up with the
beam coming out of the bottom of the specimen. In a
TEM/STEM, the STEM detectors are usually mounted below the
phosphor screen, and normally you can't actually see them.
Quite often, because of space constraints, they are not
mounted on the centre line of the microscope, but are off to
one side.
Ask the demonstrator: Please tell me roughly where the detectors
are relative to the centre of the phosphor screen.
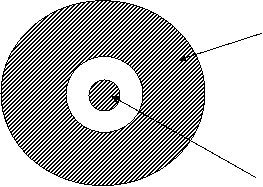
There are normally two detectors. A solid-state circular
disc is used to collect the bright-field signal. Around it
is mounted another solid-state detector in the shape of a
circular annulus, which is used to collect all the dark-
field electrons: that is, all the electrons which have
scattered to a large angle outside the cone of the
Ronchigram. Looking down on the two detectors, they look
like this:
The STEM imaging will only work properly if we get three
variables correctly adjusted: the camera-length (i.e. the
effective distance or magnification between the specimen and
the detector plane) and the x- and y-shift of the detector
plane. It sounds simple, but there are a lot of things that
can go wrong.
Suppose for a moment that the detectors are on the optic
axis. What effect does changing the camera length have?
Look at the next diagram.
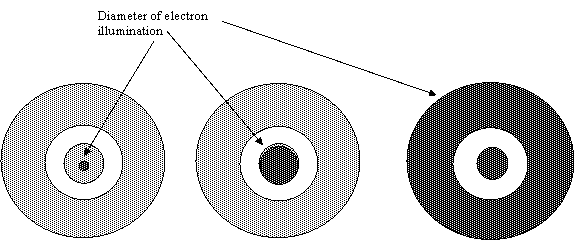
At very short camera-lengths, the disc of the Ronchigram
will be much smaller than the disc of the bright-field
detector. This condition is good for dark-field imaging,
because the annular detector is effectively lying at a high
angle which is what we want for easy image interpretation.
The image contrast is roughly proportional to the Rutherford
scattering of electrons from the atomic nuclei.
As the camera length increases, the Ronchigram gets bigger
and bigger, until it reaches a point where it covers all the
bright-field detector. In this condition, the signals on
both the dark-field and bright-field detectors are at a
maximum, although the contrast on both images will be rather
poor.
At even longer camera lengths, both the bright-field
detector and the annular dark field detector is covered by
the Ronchigram. In this condition, the bright-field image
is very noisy and has low intensity, but it will have much
more contrast and will be more like a conventional bright-
field image in TEM mode.
However, for any one camera length, think of all the things
that can go wrong if the detector is not properly aligned,
as shown in the next figure:
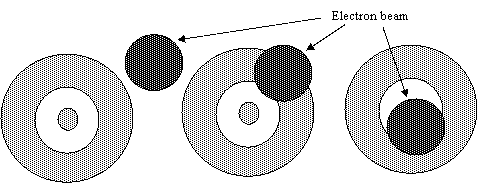
Clearly, if the Ronchigram misses both detectors (which, by
Sod's Law, is the most likely occurrence) then we will see
nothing at all on the STEM monitors, because very few
electrons will be hitting either of the detectors.
If the
detector is almost aligned correctly, the central disc of
the Ronchigram will hit the dark-field detector, but miss
the bright-field detector. Under these circumstances, the
signal displayed on the so-called dark-field monitor will be
bright, and will look like a bright-field image, because it
is collecting all the electrons which have passed through
the specimen. Even worse, the so-called bright-field
detector will be detecting high-angle scattered dark-field
electrons, and so it will look like a dark-field image.
Because the annular dark-field detector is so much larger
than the bright-field detector, there are many more ways to
get this inversion of signals to occur than to get the
signals the right way round. For this reason, people often
spend many happy hours thinking the monitors on the STEM are
the wrong way round.
Remember: If the detectors are mis-aligned in STEM, their
signals will appear to be the wrong way round, and there are
more ways for this happen than to get the signals the right
way round.
Experiment: Line up the Ronchigram as well as you can,
focussing it with the objective lens. Adjust the camera
length so that the Ronchigram is a small disc (ask the
demonstrator what 'small' means in this context - ideally about
the size of the bright-field detector). Adjust the detector
align so that, roughly speaking, the beam is hitting the
phosphor at the place where the demonstrator told you the
detectors are mounted. De-select the alignment page. Lift
the phosphor screen and start the beam scanning. Select the
very lowest STEM magnification possible.
Ask the demonstrator: How do I adjust the monitors to get their
grey-levels, gain and offset roughly right? Which detector
corresponds to the bright-field image and which is the dark-
field image. How do adjust the gain and offset of the
detectors?
Note that you should the gains and offsets of the display unit
right first, before you begin playing the gains and offsets of the
detectors themselves
The chances are that when you see the STEM images, their
contrasts will be the wrong way round, or they will both be
bright or both dark. As a first step, get the dark-field
detector lined up. To get a good annular dark-field image,
you must have a sufficiently short camera length so that the
cone of the Ronchigram is small enough to fit inside the
dark field detector. Start off with a small camera length
and a small condenser aperture (which is best aligned, as
before, in the Ronchigram). Observe the dark-field STEM
image at low magnification.
Ask the demonstrator: How do I adjust the detector alignment?
Adjust the two knobs that control the x-y displacement of
the detector plane, keeping your eyes on the dark-field
image. As you go through the full range of offsets on one
of the knobs, one of three things will happen:
- the image stays dark;
- it starts dark gets bright and then gets dark;
- it goes dark-bright-dark-bright-dark.
The second two situations correspond to the Ronchigram moving over the
detector as follows:
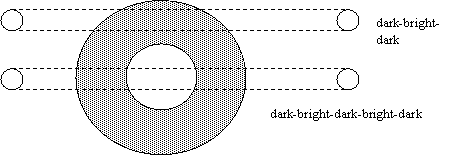
If you never get the dark-bright-dark-bright-dark
combination, it means the camera length is too long, so the disc of
electrons can't fit inside the inner diameter of the
detector. What we want is to be in the central dark region
of the dark-bright-dark-bright-dark range of the
adjustments. Doing this blind - i.e. by just watching the
dark-field image - sounds difficult, but is easy to learn
when you have a picture in your mind of what's going on. Of
course, the bright-field image will become bright when you the
dark-field detector is on line, which is a useful hint.
Aside: You can actually form an image of the STEM
detectors on the scanning screens by doing one of three
things (in order of drasticness):
- put the objective out of focus,
- under-focus the diffraction lens
- wreck the pivot points.
Draw the ray diagrams to work out why
all these things will cause the Ronchigram to scan
across the detectors, and thus form an image of them.
To perfect the image, you should now focus with the
objective pre-field (i.e. focus the objective) and stigmate
the image by adjusting the condenser stigmators. You can
also re-adjust the objective rotation centre using the dark-
field image, but this correction will only be approximate if
the condenser aperture is not exactly on line. The best
place to get the probe-forming system lined up is in the
Ronchigram.
To get the bright-field detector accurately on-line at high
camera length, wobble the objective lens (i.e. align the
rotation centre) and adjust the detector shift until the
bright-field image is stationary. Be warned that this only
works if the condenser aperture, condenser lens and objective lens
is already accurately aligned in the Ronchigram.
Some computer-controlled microscopes will not
let you do this, and so you may have to wobble the objective
by manually defocussing it back and forth.
The ideal resolution can only be achieved if you have the
correct convergence angle relative to condenser aperture
size. In STEM, the biggest influence on very high
resolution is the demagnification of source. Even in our
very first experiment, we saw that when we form
a probe in the specimen plane, what we actually see is an
image of the source. If source is big, then we have no hope
of achieving good STEM resolution. We can make the
effective source size small by demagnifying its image, which
we know we can do by increasing the spot size. But as spot
size goes up, intensity - or the number of electrons going
through the probe - goes down. STEM images are pretty noisy
and hard to see at the best of times. Good STEM resolution
can therefore only be obtained with a very bright source,
i.e. by using a field-emission gun.


Copyright J M Rodenburg
| 