OK, so let's go...
If you start at 9am, you can learn to get take a picture on a TEM by 10.30am the same day. It might not be a very
good picture, but taking the first shot will always give you enormous confidence. The crucial thing is to get your hands
on the instrument itself.
Here, instructions are
given for both the person being taught and the teacher. I'll call the teacher a ‘
demonstrator’: in a research environment, this person is likely to be post-doc or a more experienced research
student.
9.00am
Ask the demonstrator: To remove any specimen, switch
on the microscope and the electron beam, preferably with the filament slightly
under saturated. Align the condensers and gun. Form an image of the source at
about 4000x magnification. Align a large condenser aperture. Let me see the
screen and tell me which knob controls the second condenser lens (C2).
It will probably take a bit of time for the demonstrator to get the microscope up and running. While you are
waiting you may as well spend the time doing the simplest imaginable optical experiment. If you know about ray
optics, you can skip to the first electron experiment. If you are unfamiliar with ray diagrams, then...
Experiment: Pick up an ordinary optical lens and
hold it parallel to a white piece of paper. In any well-equipped electron microscopy laboratory there should be an
optical lens for examining the specimen before you put it into the electron microscope. If there is a light-bulb
nearby -
the room light will do - position the lens below the light with the piece of paper underneath
it. Move the lens up and down relative to the piece of paper and
try to form a sharp image on the piece of paper. You should be able to form an
image of the light bulb, or whatever the top of the lens is pointing towards.
This experiment is analogous to the first experiment we will do in the electron
microscope.
Theory: We
draw a lens, whether it be an optical lens or electron lens, like this.

The picture is meant to represent a cross-section through
the lens. Imagine cutting an optical lens in half, right through its centre.
Some demonstrators and textbooks draw a lens as a line with two points at the
end, like this

because it is much quicker than drawing two curved lines.
Demonstrators and textbooks draw lines going through the
lens to represent rays of light, or rays of electrons. Rays of electrons are
often called 'beams'. There are some very important differences between
optical lenses and electron lenses, but to begin with we can treat them as
roughly the same.
The first important rule is that any ray or beam that passes
through the very middle of a lens continues in a straight line, no matter what
angle it goes through the lens. (In fact, like almost everything we say in the
first lesson or two, that last statement is not perfectly true, but to begin
with it is a very good approximation.)
Using the first rule,
we could draw a diagram of our first experiment like this.
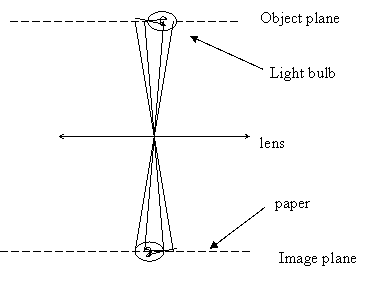
All the rays or beams we have drawn are straight lines
through the middle of the lens. We have drawn the source (light-bulb or
filament) at the top of the diagram, in what is called the 'object plane'
because that's where the object we are looking at is actually positioned in
reality. The image appears on the piece of paper or, (in the electron
microscope) the phosphor screen, at the bottom of the diagram, which called the
'image plane'. Note that the image is upside down relative to the object,
because the rays have crossed over in the middle of the lens.
This diagram is a good start, but it not very informative
because it does not explain why the image goes in and out of focus when you move
the lens up and down. If we move the lens up, like this
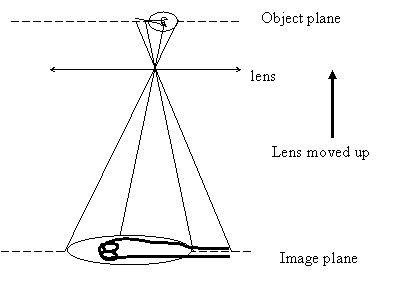
all that happens is that the image gets bigger.
To understand focus, we must consider rays or beams which do
not go through the middle of the lens. Lets draw one beam that goes through
the middle of the lens, and one other beam that comes from the same bit of the
object, but goes through the side of the lens, like this:

Now we see that there is only one distance away from the
lens where both beams coming from the same point of the object meet up in the
image: that is the place where the two beams cross. In fact, this is really
the definition of a lens. In a perfect lens, all rays from one point in the
image, and which do not go straight through the centre of the lens, are bent by
exactly the right amount to go through one point in the image plane.
Think of the optical experiment. When we arrange the piece
of paper and the lens so that the image is in sharp focus, we can draw lots of
rays or beams, which go through different parts of the lens, like this:

When the lens is focussed (as above) all the rays from any
point in the object come to one point in the image. Now lets draw lots of rays
or beams when the lens is moved up, away from the focus position:

Why does the image appear blurred? The easiest way to
understand this is to just concentrate on two rays or beams, which come from a
single point in the object. Redrawing the last diagram, but with only two
beams, we have
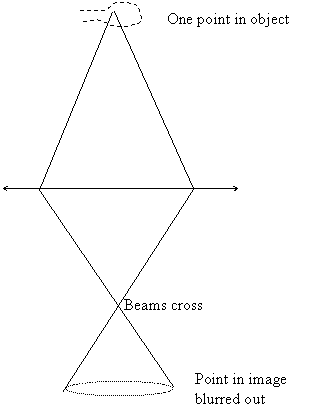
The place where the two beams cross is called, not
surprisingly, a beam cross-over. If we are trying to make a sharp image of
some object, it is essential that all the beams that come out at different angles
from the object meet up at a single cross-over in the image plane. If they
don't, that single point in the object will appear blurred or spread out by the
amount that the rays have missed each other.
Now we come to first important difference between optical
lenses and electron lenses. The knob that controls C2 (the 'brightness' knob)
does not change the distance between the lens and the phosphor screen, it
actually changes the strength of the electron lens. Here are two lenses, one
thin and one thick.

A thin lens is called a weak lens, a thick lens is called a
strong lens. When we draw the rays or beams through the two lenses, they
appear like this:
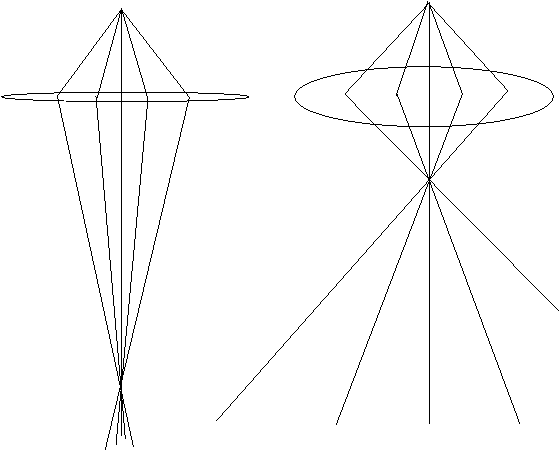
The source (or object) is in the same position relative to
both lenses, but note that the strong lens focusses the beams into a cross-over
at a point much closer to the lens. The 'focal length' of a lens
is a measure of its strength, and it is defined as the distance between the
lens and the beam cross-over (which is also known as the focal point) when all
the beams coming into the lens are parallel to one another, as shown below. A strong
lens has a short focal length.
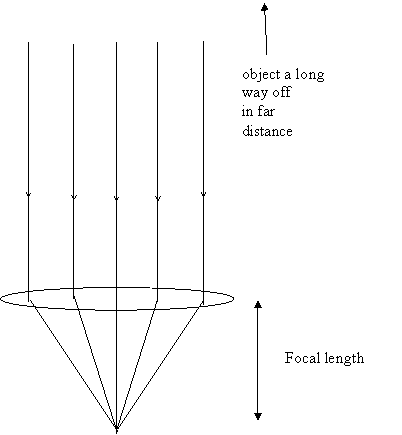
The best way to make the beams going into a lens parallel is
to point at it at something a very long distance away. An easy way to measure
the focal length of the lens you used in the optical experiment is to use it
and the piece of paper to form an image of a scene through a window of some
distant buildings. When the buildings are in focus (which are effectively so
far away that all the beams from any point on them are travelling parallel to
one another through the width of the lens), then the paper is lying at the
focal length of the lens.
OK, so lets get back to the electron microscope
Remember, we had asked the demonstrator: To remove any specimen, switch
on the microscope and the electron beam, preferably with the filament slightly
under saturated. Align the condensers and gun. Form an image of the source at
about 4000x magnification. Align a large condenser aperture. Let me see the
screen and tell me which knob controls the second condenser lens (C2).
The demonstrator will probably then read the riot act
Don’t worry that you don’t know what ‘C2’ means. C2 is just
the name of one of the lenses in the electron microscope, and we will use it to
perform our first experiment, which is equivalent to the one we did above with the optical lens.
The knob that controls C2 will probably be labelled
‘intensity’ or ‘brightness’ (depending on the make of the microscope), because
when you are actually using the electron microscope, it affects how bright the
image appears on the screen.
The demonstrator says: “Well, despite everything I
just said in the ‘riot act’, you can turn the brightness knob (C2) whenever you
want. In fact, you have to turn it all the time when are using the electron
microscope. I give you full permission to turn the brightness knob (C2) as
much as you like, whenever you like: there is nothing you can do by turning
this knob that will ever damage the electron microscope or inconvenience other
users.”
Experiment: Turn the brightness knob (C2) fully
in both directions and see what happens on the phosphor screen, which is at the
bottom of the electron microscope. When the electrons hit the screen, they
give off light, so you can see what’s going on. When you bring the brightness
knob to a focus - i.e. when the beam becomes a bright tiny spot - you are
seeing an image of the source of electrons, which is equivalent to the light
bulb in the optical experiment . Look closely at the focussed spot.
What you can see is an image of the filament (which is another name for the
electron source).
The ray diagram for the condenser looks like this:
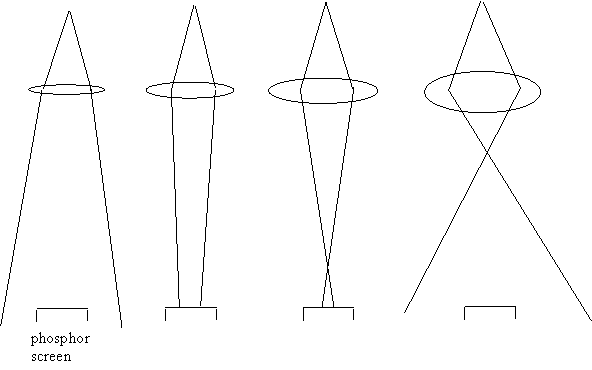
When C2 is weak, which happens when the brightness knob which
controls C2 is turned fully anti-clockwise, the rays from the source spread all
over the phosphor screen. As we turn up C2, which we do by turning the
brightness knob clockwise, the rays get more and more concentrated on the
screen, so what we see gets brighter and brighter. Then we reach the focal
position: electrons coming from any particular point on the source all arrive
at the same place, and so we can see a sharp image of the source.
As we turn C2 yet higher, the beams spread out again into a
circle shape, which eventually spills off the phosphor screen. As we turn it
even higher, the screen gets darker and darker as the electrons get spread ever
more thinly.
When an electron lens is turned up (knob turned clockwise)
above the focal position, it is said to be ‘over-focussed’; when
it is turned down it is said to be ‘under-focussed’. Focus is an
essential experimental variable in electron microscopy, especially in high
resolution imaging.When you are doing normal imaging, you should always run C2
(the brightness or intensity) over-focussed: in other words like in the
right-hand diagram above. The reason for this is explained elsewhere.


Copyright J M Rodenburg
| 
