Diffraction mode
So far, everything we have done has been in what is called
'imaging mode'. Modern electron microscopes have several
different modes of operation: imaging mode, diffraction
mode, spot mode, micro-diffraction mode, nano-diffraction
mode, scanning mode, rocking-beam mode, and all sorts of
other flavours and variations.
After imaging mode, the next most useful mode is diffraction
mode - sometimes called 'selected area diffraction'. For
the first 40 years of electron microscopy, these were the
only two modes available. It is essential that you
understand the relationship between imaging and diffraction.
In fact, it is so essential that most people teach
diffraction mode almost immediately after teaching you to
look at the phosphor screen.
Ask the demonstrator: Please load a crystalline sample:
something easy like single crystal gold test specimen,
preferably with a few holes in it.
Experiment: Watch the demonstrator load the new sample. It's
usually pretty easy to do, and we can learn to do it in the
next chapter. Let the demonstrator supervise as you turn on the
beam. Find a hole in the specimen. Check the condenser
alignment, including the condenser aperture and gun shifts.
Correct the eucentric height. Focus the objective. It's
much harder to focus on a crystal - especially without an
objective aperture which we haven't learnt about yet -
you'll see all sorts of funny ghostly images going in and
out. If necessary, ask the demonstrator for advice.
Check the pivot points. Check, very roughly, the current
centre.
Now, before going into diffraction mode, insert a selected
area aperture. The SAD aperture is the lowest one in the
column. If necessary, ask the demonstrator to remind you how to
change its size and position. If the screen goes blank when
you put it in, go down in magnification. Move it into the
centre of the screen, and go up in magnification, keeping it
in the centre of the screen. Move the specimen so that a thin
(i.e. a bright) part of it is inside the aperture. Over-
focus the brightness knob (C2) so that the screen goes quite
dark.
Ask the demonstrator: Show me how to go into diffraction mode.
You will probably have to press a button. Watch the screen.
Everything changes and we can see a series of points or
little discs.
In fact, despite the fact that new mode looks completely
different and strange, only one thing has changed: the
projector system has changed setting so that instead of
focussing on the first image plane (and hence passing
whatever is there onto to the phosphor screen), it is now
focussed on the back focal plane of the objective. So, now
we have to understand what the back focal plane of the
objective is.
In this figure,
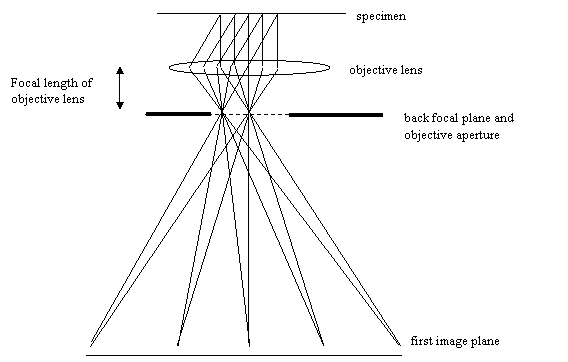
we draw some rays coming out from different
points in the specimen, which were then focussed on the
image plane. Looking at the diagram, the beams reach a
focus - that is to say they meet up with one another - at
the image plane. But some pairs of beams also cross-over
one another much further up the diagram, near the back of
the lens. The back focal plane is that place where beams
that come out of the specimen parallel to one another cross-
over one another.
Aside: Ray diagrams can be rather confusing. In the
diagrams we have used, we sometimes draw rays from one
point in the object that go through different parts of
the lens, or sometimes rays from different parts of the
object that all go through the centre of the lens. In
the next diagram, we draw rays that come from many
different parts of the object, but which are all at the
same angle to each other.
Why are we allowed to choose the different types of
rays we draw? In fact, every point in a particular
optical plane has rays going through it (or, in the
case of the specimen plane, being scattered from it),
and each of these points has a distribution of angles
of rays going through it. To characterise a particular
ray, we need a position and an angle (two co-
ordinates). In the real world, the positions and
angles are two-dimensional, so we really need four co-
ordinates. The mathematics of ray propagation (called
optical transfer theory) is therefore sometimes
formulated in terms of a series of four numbers - a four-
element vector. Lenses and other optical components
act on these vectors in the form of four-by-four
matrices. In other words, ray diagrams really are
quite complicated - we have just made them easy by
concentrating on sub-sets of positions, destinations
(position and angle) or angles. Many textbook diagrams
on electron microscopy are exceedingly confusing,
because people try to show all the rays for lots of
lenses at once.
In the figure above we consider a number of different points in
the specimen plane, each of which is scattering a ray at two
different angles. Rays at a particular angle, from any
point in the image, meet up at one point at the back of the
lens. We see that this
confluence of parallel rays occurs, by definition, at the
focal length of the lens. All such points lie on a plane
called the back-focal plane of the lens. (Super pedants
will point out that for a perfect imaging lens - one that
would form an unaberrated image on a flat image plane - the
back focal plane is very slightly curved.) What we see in
the back focal plane is the angular distribution of
intensity we would have seen if the lens had not existed,
but if the angular pattern of rays scattered from the
specimen had been allowed to travel very far away: to the so-
called Fraunhofer diffraction plane.
We see spots because the specimen is crystalline, and so it
acts as a diffraction grating for the electrons, which
really behave as waves. This is a crucially important
relationship in electron microscopy, but let's just keep to
the practicalities for now.
When we press the diffraction button, the strength of next
electron lens below the objective is decreased, so that it
is now focussed on the back focal plane of the objective
lens, as shown below.
Because the objective lens has a large magnification factor,
the back focal plane is very close to the lens itself. In
fact, we can think of the back focal plane being co-incident
with the lens: in practice is it about 1 mm below the
specimen.
Mounted in the back-focal plane is the objective aperture:
the middle aperture on the column.
Experiment: Go into diffraction mode. Put in an objective
aperture. Can you see it? You might not be able to see it
very easily because the diffraction pattern from a crystal
is just made of spots - the spots will go on and off as the
object aperture is moved about. It is quite easy to 'lose'
the objective aperture; finding it again is just one of the
fun parts of being an electron microscopist (!) Sometimes
it is easier to see if you have an amorphous (non-
crystalline) specimen, which scatters is all directions,
instead of just into spots.
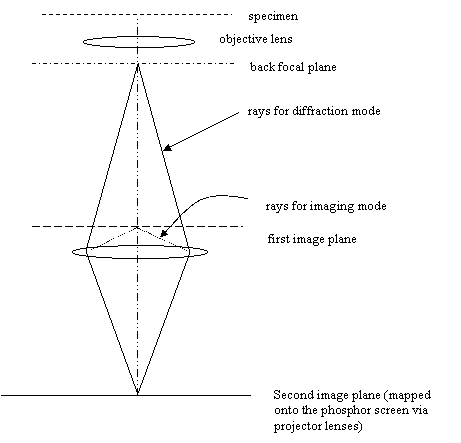
What does the selected area aperture play in all of this?
It's sitting in the first image plane below the specimen,
which is below both the objective lens and the objective
aperture. When in diffraction mode, the objective and the
lens below it (sometimes called the 'first intermediate
lens' or 'diffraction lens) are arranged like this:
It is important to emphasise that the difference between
diffraction mode and image mode only arises from which
optical plane we choose to map onto the phosphor screen. By
changing the excitation of the first lens below the
objective, we can form either an image or a diffraction
pattern (which is an 'image' of whatever is going on at the
back focal plane). However, when we form a diffraction
pattern, we are still 'looking through' the selected area
aperture, so the diffraction pattern we see on the screen is
not really what's at the back-focal plane, it's the
diffraction pattern we would see from the part of the
specimen which has been selected by the selected area
aperture in the image plane.

Look at the figure above. We have
only drawn three beams coming out of the specimen; two from
a point on the optic axis; and one from a point off the
optic axis. Of the first two beams, only one gets through
the objective aperture - the other is coming out of the
specimen at too high an angle. The beam from the second
point makes an appearance in the back focal plane, but gets
stopped by the selected area aperture, because it originated
from a point which was too far away from the optic axis in
the specimen plane.
Remember: The objective aperture filters out beams which
come out of the specimen in a particular range of angles.
The selected area aperture filters out beams which have come
from a particular set of positions in the specimen. They do
these jobs all the time, irrespective of whether we are in
diffraction or image mode. Never record an image without
knowing what's being filtered out by the objective aperture.
Never record a diffraction without knowing which bit of
specimen has been selected by the selected area diffraction
aperture.
Experiment: Under the guidance of the demonstrator, practice
flipping between image mode and diffraction mode. Move the
specimen so that a hole appears. Position a selected area
aperture over the hole, so none the specimen within its
shadow. In diffraction mode, there is now only one central
spot. Why?
When in diffraction mode, the demonstrator may read another 'riot
act' about burning holes in the phosphor screen with a very
bright spot.
Ask the demonstrator: Show me how to cover the central
diffraction peak with the beam stopper. Show me how the
shift the diffraction pattern. Show me how to focus the
diffraction pattern with the diffraction lens. Show me how
to correct astigmatism in the diffraction lens.
All these things - shift, astigmatism and focus - are what
we have learnt about before for the condenser lenses and the
objective lens. The diffraction lens, immediately below the
objective lens, is the last important lens that we need to
learn about.
Now we know just about everything about the electron
microscope, we can try to understand various technical
issues in more detail...


Copyright J M Rodenburg
| 